> For the complete documentation index, see [llms.txt](https://docs.getmesa.com/llms.txt). Markdown versions of documentation pages are available by appending `.md` to page URLs; this page is available as [Markdown](https://docs.getmesa.com/connect/shipstation.md).

# ShipStation

### Connection <a href="#connect" id="connect"></a>

When you're setting up your first workflow with ShipStation, you'll need to add your **Key** and **Secret** so that ShipStation is a connected app within MESA.

<figure><img src="https://3425906282-files.gitbook.io/~/files/v0/b/gitbook-x-prod.appspot.com/o/spaces%2F1H6u1HQc3Iew7ATmmiCi%2Fuploads%2FD8OcwaA7PWdxL2Vlqbyn%2Fshipstation-order-updated-credential.png?alt=media&amp;token=e9f15cc7-3ac3-41ed-9759-34c5d6560eac" alt="Screenshot of the MESA ShipStation step connection setup, adding your Key and Secret so ShipStation becomes a connected app. Spotlight the Key and Secret credential fields."><figcaption></figcaption></figure>

To locate the **Key** and **Secret**, you can click on **Settings** (gear icon), on the top right hand corner in the ShipStation dashboard.

<figure><img src="https://3425906282-files.gitbook.io/~/files/v0/b/gitbook-x-prod.appspot.com/o/spaces%2F1H6u1HQc3Iew7ATmmiCi%2Fuploads%2FivbRFqTdLIJn8vt0yuy4%2Fshipstation-settings.png?alt=media&amp;token=d119f830-2a1f-429a-8cf0-06f5d43a802d" alt="Screenshot of the ShipStation dashboard. Spotlight the Settings gear icon in the top right hand corner."><figcaption></figcaption></figure>

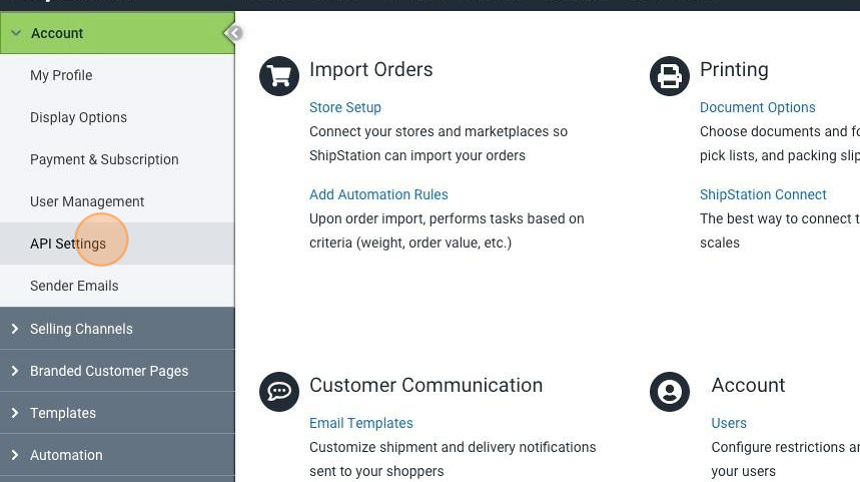
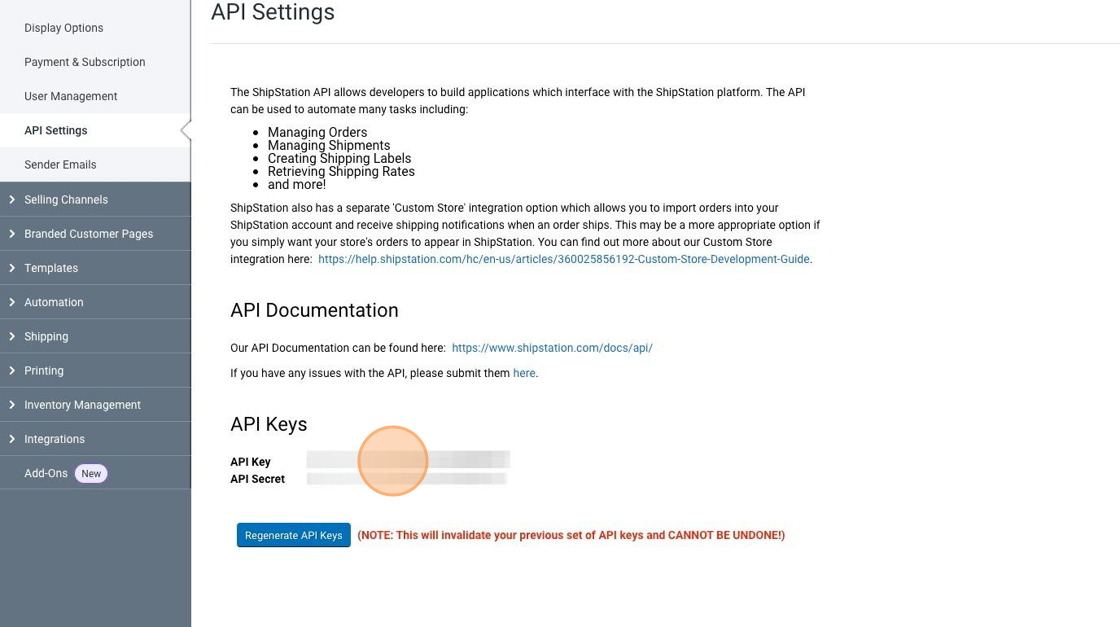
Then, click on **Account** and then **API Settings**. You will locate your existing API Key there or you can click to generate an API Key.

<figure><img src="https://3425906282-files.gitbook.io/~/files/v0/b/gitbook-x-prod.appspot.com/o/spaces%2F1H6u1HQc3Iew7ATmmiCi%2Fuploads%2FUqwBhKDzCDFd1BxhU4Xd%2Fshipstation-api-settings.png?alt=media&amp;token=0f0d3154-f743-4793-9424-db7a8818bda8" alt="Screenshot of the ShipStation Settings, Account API Settings page where you locate or generate an API Key. Spotlight the API Settings section."><figcaption></figcaption></figure>

Copy the value next to **API Key** and paste it into the **Key** field in MESA.

Copy the value next to **API Secret** and paste it into the **Secret** field in MESA.

Lastly, click on **Add Connection** and then you are all set!

<figure><img src="https://3425906282-files.gitbook.io/~/files/v0/b/gitbook-x-prod.appspot.com/o/spaces%2F1H6u1HQc3Iew7ATmmiCi%2Fuploads%2FeUuaZ051i7ms0qxI9XY2%2Fshipstation-api-keys.png?alt=media&amp;token=1e2631d1-0d72-4ba0-9d82-dd8dad73a0a6" alt="Screenshot of the MESA ShipStation connection form with the API Key pasted into the Key field and the API Secret pasted into the Secret field. Spotlight the Add Connection button."><figcaption></figcaption></figure>

### Configuration <a href="#configuring" id="configuring"></a>

#### Select the Store ID field <a href="#storeid" id="storeid"></a>

For some **ShipStation** actions in MESA, including **Create Order**, **Update Order**, **Create Label for Order** and **Create Label for Shipment**, you will need to fill in the **Store ID** field. This ensures that the order / label is assigned to a specific Shopify store configured in your **ShipStation** account.

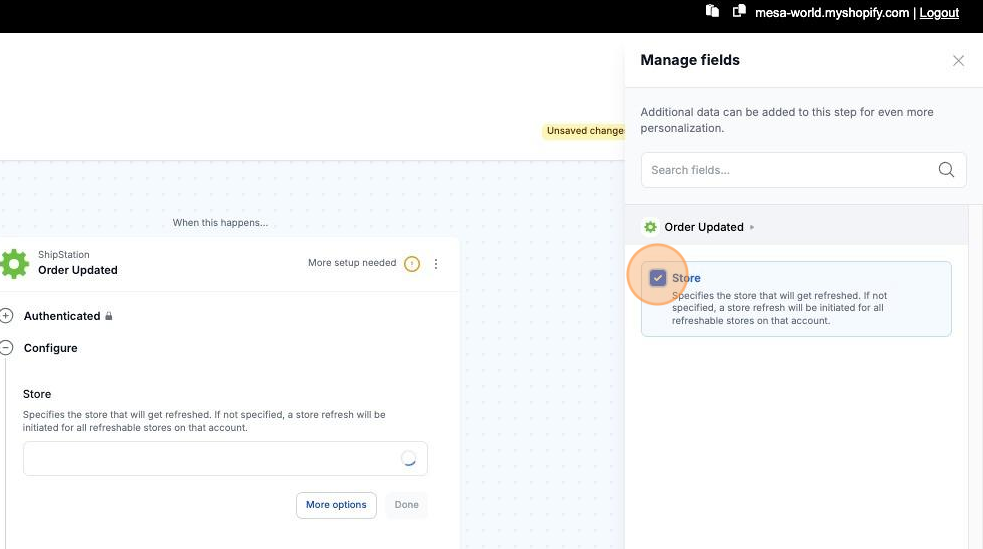
First, please ensure that you have [connected ShipStation with MESA](#connect). Then, locate the **More options** button and click it. Select the **Store** checkbox and choose a Store from the drop-down menu. Make sure to save your changes!

<figure><img src="https://3425906282-files.gitbook.io/~/files/v0/b/gitbook-x-prod.appspot.com/o/spaces%2F1H6u1HQc3Iew7ATmmiCi%2Fuploads%2FM9fTwWS5bBuSEOd7NZNa%2Fshipstation-more-options.png?alt=media&amp;token=6ea02e5d-1d80-46dd-aab4-4a16a7eb7d1c" alt="Screenshot of a MESA ShipStation action step such as Create Order. Spotlight the More options button."><figcaption></figcaption></figure>

<figure><img src="https://3425906282-files.gitbook.io/~/files/v0/b/gitbook-x-prod.appspot.com/o/spaces%2F1H6u1HQc3Iew7ATmmiCi%2Fuploads%2FyB3bkujPtjlKnE4wbmzu%2Fshipstation-store.png?alt=media&amp;token=46de9628-7430-46f9-aa91-515f8930ed83" alt="Screenshot of a MESA ShipStation action More options with the Store checkbox enabled. Spotlight the Store drop-down menu."><figcaption></figcaption></figure>

### I don't see my ShipStation workflow activating when I update something in ShipStation? <a href="#triggers" id="triggers"></a>

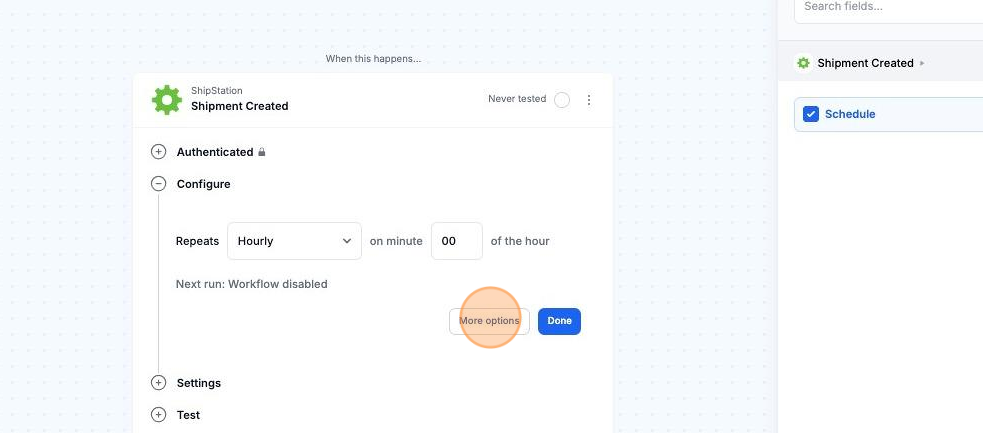
MESA workflows that contain ShipStation [Triggers](/workflow-builder/triggers.md) (such as **Shipment Created**) will run on a polling system. Meaning, on every hour or whatever the selected frequency is selected in your MESA workflow, MESA will look for any recent activity in ShipStation. As a result, you may not see immediate activity in your MESA workflow until the frequency hits.

In ShipStation triggers, you can find the polling system (Schedule) under **More options**. You can keep the default frequency or adjust it.

<figure><img src="https://3425906282-files.gitbook.io/~/files/v0/b/gitbook-x-prod.appspot.com/o/spaces%2F1H6u1HQc3Iew7ATmmiCi%2Fuploads%2FTcQxX0ZFwRPA9kt8PX7n%2Fshipstation-schedule.png?alt=media&amp;token=002c8bf6-4b34-460b-806c-177174f0668a" alt="Screenshot of a MESA ShipStation trigger More options showing the polling system frequency. Spotlight the Schedule frequency setting."><figcaption></figcaption></figure>

Once the frequency hits, MESA will process every single task that has accrued within the previous timeframe.

{% hint style="info" %}
Please note that available frequencies will differ depending on your MESA billing plan.
{% endhint %}